Follow Laurie (owner since 2020) on Facebook
https://www.facebook.com/me/.
Check out previous designs here:
https://www.facebook.com/me/.
Check out previous designs here:

Cuddle Soft Hugs
 Do you like giving hugs? Well, this is the best hug you can give, mostly because it keeps on hugging, even when you're not there.
 These great little hug are 30" x 36" and are made from 100% polyester two sided Cuddle Fleece. It is soooo soft and Cuddly. This little blanket is the perfect receiving blanket. It comes rolled up in a 7" strip of Cuddle fabric that becomes the binding. Just follow these simple instructions and you will be amazed at how easy and fun this little blanket is to make.
This is the way your little hug will come. Just cut the binding strip into 3-2" strips. Sew them together end to end and sew it on like a regular binding. I like to cut the ends on an angle like I would for a bias strip.

The binding is easier to sew on if you round the corners of the blanket. The best circle template is a medium sized saucer. After you have squared up your blanket just place the saucer on the corners and use your rotary cutter. If you have the large cutter you can cut all four corners at once.

Start sewing the strip on. I like to use a good 1/2" seam allowance. Using a walking foot helps feed the fabric a little smoother and I have better luck sewing the cuddle fabrics with a Schmetz size 90 stretch needle. I lengthen my stitch to a 3.5.

Be careful going around the corners. If you pull just a little on the fleece as you go around, and just ease in the binding the corners won't roll as much. You want a little extra binding to ease in so when you roll it over there is plenty of stretch.

Finishing that binding was always the hardest part of binding a quilt for me, until someone showed me how to do it this way. Trim the bottom binding strip to the same angle as the top. Overlap them 1/2". Cut the top angle to match the bottom. That half inch is your seam allowance so be generous. It is easier to take a bigger seam if you need to. Because they are both stretchy it is better to make it a little smaller so that you can ease it in with the bottom. You may have to re-adjust your seam allowance.

Overlap and sew your binding strip together. Trim your edges to reduce the bulk.

Finish sewing down the completed strip. I like to trim off the edge of the seam so there isn't so much bulk inside of the seam when you fold the binding over.

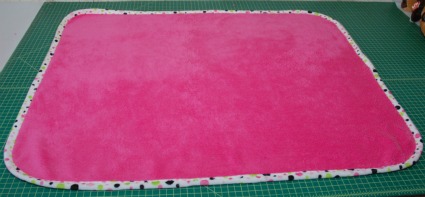
Fold the binding around to the other side of the blanket. I like to use the serpentine stitch, but a zig-zag or decorative stitch makes a good edge as well. If you can keep that folded edge just a little over the stitching line and your topstitching just on the inside edge your topstitching will be right on the inside edge of the other side.

You're all finished!!!! What a quick and easy gift. I bet you could give these at a baby shower and you won't see another one there. This is a great gift finished or as a do-it-yourself gift to the quilter. They are quick and easy and it soon becomes everyone's favorite blanket because they are soooo soft and Cuddly.

Cuddle Fleece Hugs
~~~~~~~~~~~~~~~~~~~~~~~~~

Cuddle Soft Baby Snuggler
~~~~~~~~~~~~~~~~~~~~~~~~~

Bound Snuggle Blanket
~~~~~~~~~~~~~~~~~~~~~~~~~
Information
- Learning Center
- Boutiques
- Quilt Gallery
- Warm Fuzzies
Categories
Contact Us
- Phone: (208) 821-7424
- Email: info@cuddlesoftkits.com
- 523 Main #4
- Ashton, ID 83420
Follow Us